
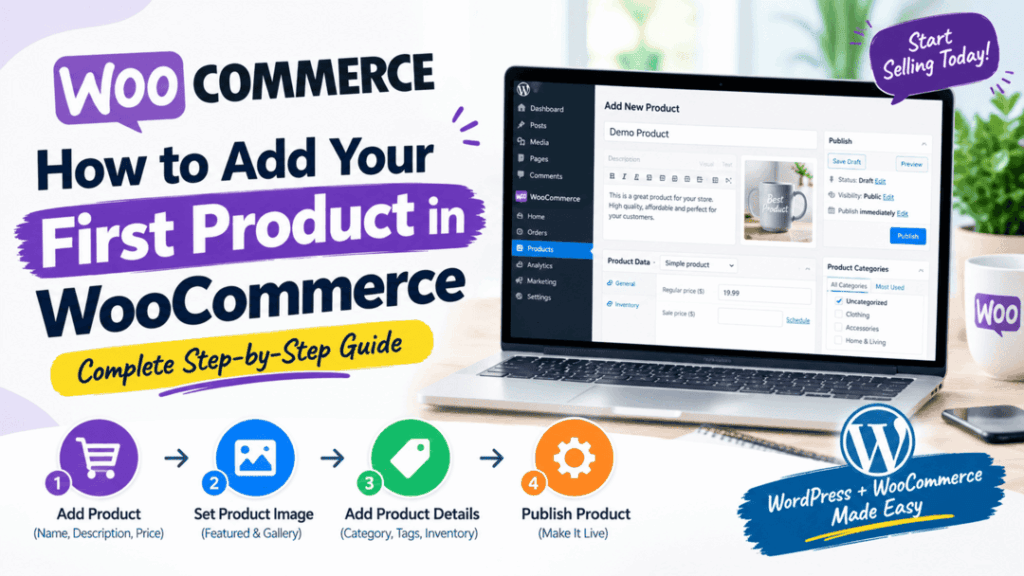
How to Add Your First Products in WooCommerce
Adding your first products is one of the most important steps when setting up a WooCommerce store.
WooCommerce makes it possible to create a basic product with only a product name and price, but a properly optimized product should include much more information. A strong product listing can help customers understand what you sell, make products easier to browse, improve the shopping experience, and provide search engines with useful information about your products.
In this guide, you’ll learn how to add your first products in WooCommerce, including product descriptions, pricing, images, categories, inventory, shipping information, product variations, and basic SEO optimization.
If you’re following a complete WooCommerce setup process, this guide is the next step after configuring your store. You can also return to our complete guide on how to set up your first WooCommerce store for the other steps involved in launching a WooCommerce website.
Quick Answer: How Do You Add a Product in WooCommerce?
To add a product in WooCommerce:
- Log in to your WordPress dashboard.
- Go to Products → Add New.
- Enter your product name.
- Write a detailed product description.
- Add a product price.
- Choose the appropriate product type.
- Add a product image and gallery images.
- Select a product category.
- Configure inventory settings.
- Add shipping information if applicable.
- Add attributes or variations when needed.
- Write a short product description.
- Review the product settings.
- Click Publish.
Your product will then be available according to its catalog visibility and store settings. Consider screenshot.
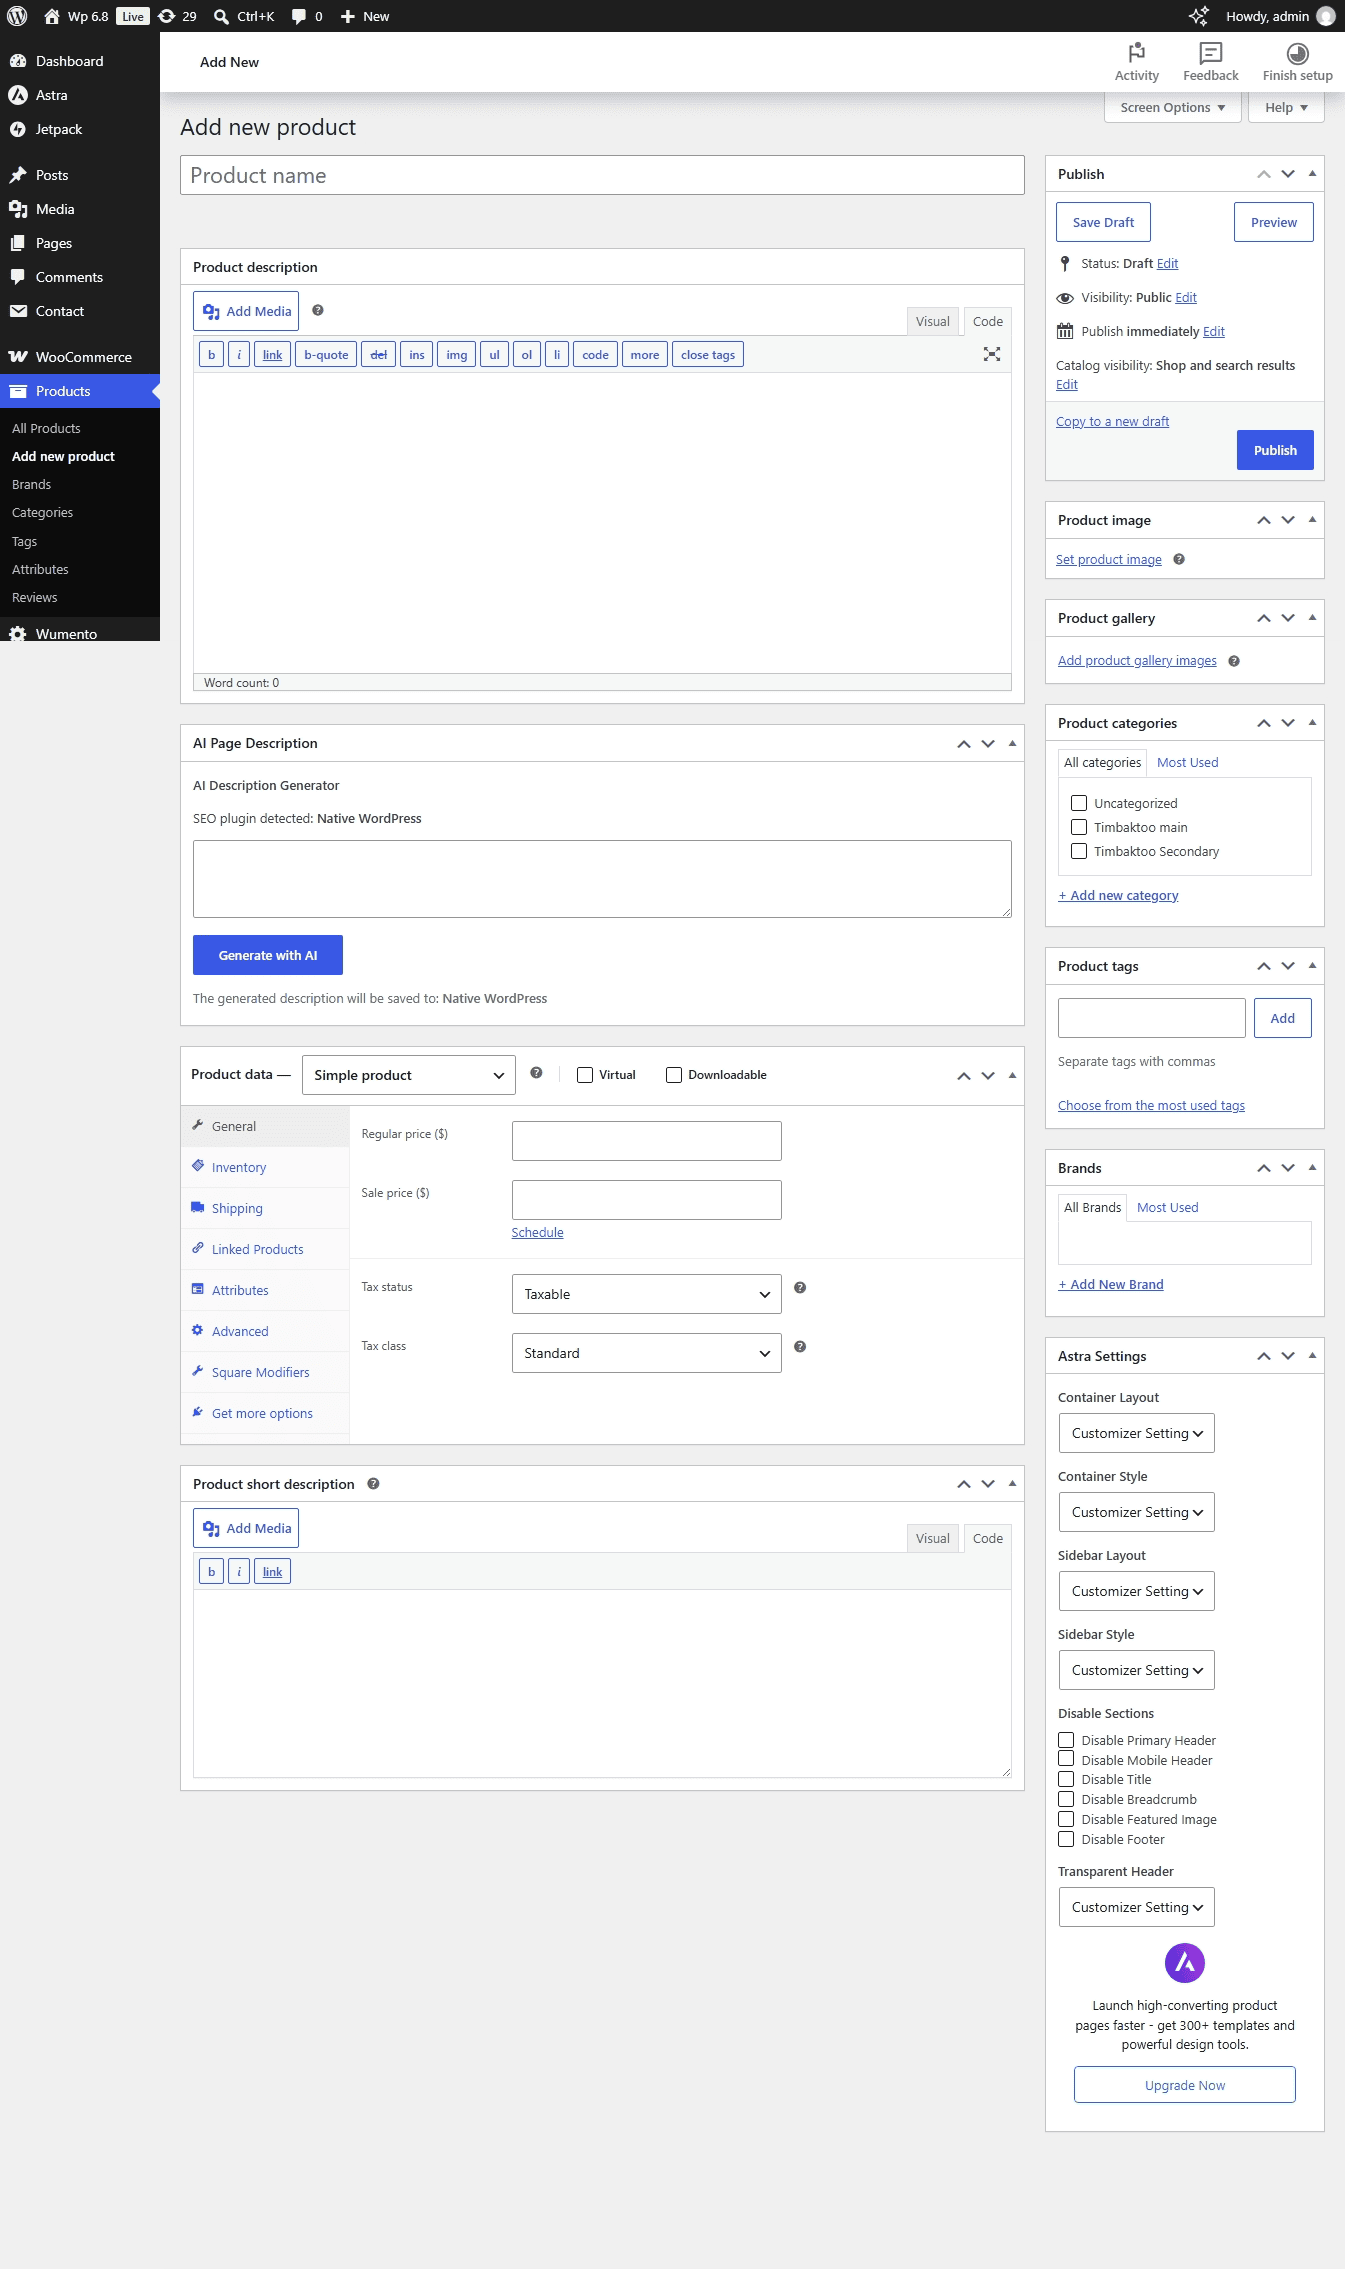
Step 1: Go to Products → Add New
Start by logging in to your WordPress administration dashboard.
From the WordPress dashboard, navigate to:
Products → Add New
This opens the WooCommerce product editor.
You can create different types of products depending on what you sell. For a basic physical product with no options or variations, a Simple product is usually the easiest place to start.
Before publishing, make sure you have the important information about your product ready, including:
- Product name
- Product description
- Price
- Product images
- Product category
- SKU, if applicable
- Stock quantity
- Shipping information
- Product attributes
- Variations, if applicable
Taking a few minutes to prepare this information can make product creation much faster. Consider screenshot below.
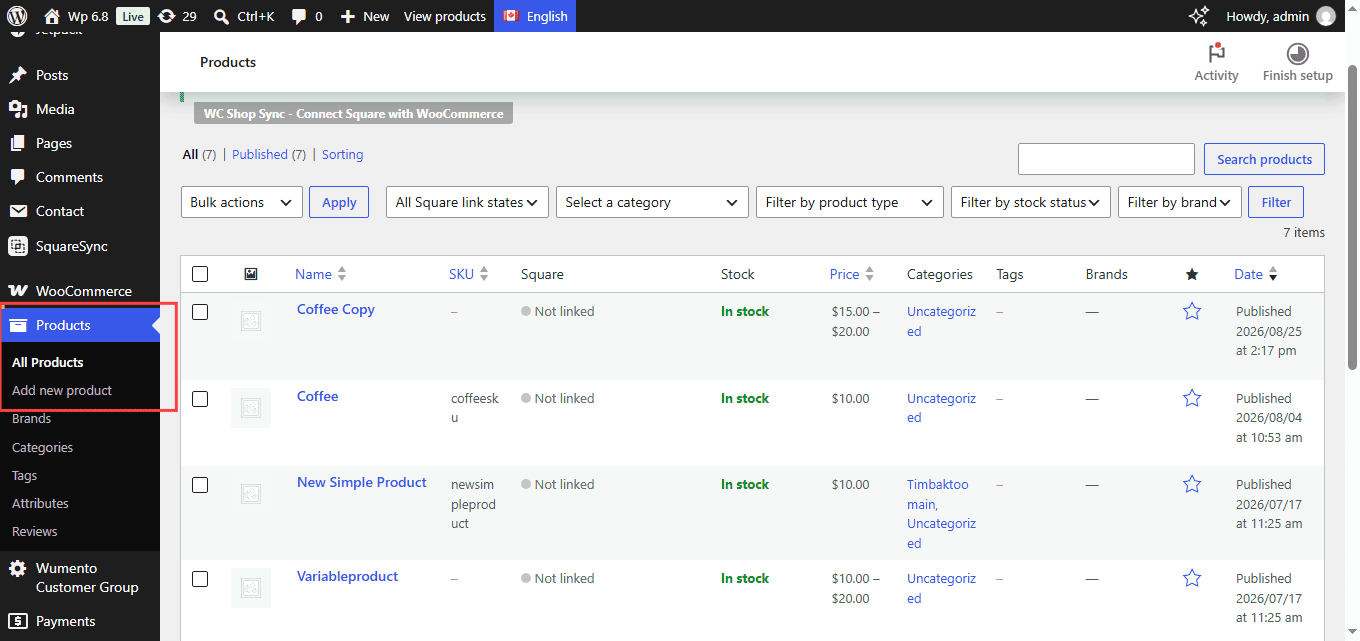
Step 2: Add a Product Name
The product name is one of the first things customers see.
It also helps search engines understand what the product page is about.
Instead of using a vague name such as:
Blue Shirt
use a more descriptive product name such as:
Men’s Slim Fit Cotton Shirt – Blue
A useful product name should clearly communicate what the customer is looking at.
Product name best practices
Try to make your product name:
- Clear
- Specific
- Descriptive
- Easy to understand
- Relevant to the product
- Natural rather than keyword-stuffed
Avoid adding unnecessary keywords simply to make the title longer.
For example, don’t use:
Buy Best Cheap Blue Cotton Shirt Men’s Shirt Online Best Shirt
Instead, use a natural title such as:
Men’s Slim Fit Cotton Shirt – Blue
The goal is to make the product immediately understandable to both shoppers and search engines.
Step 3: Write a Detailed Product Description
The main product description is where you explain the product in detail.
A good product description should answer the questions a potential customer is likely to have before purchasing.
Depending on your product, include information such as:
- What the product is
- Who it is for
- Main benefits
- Key features
- Materials
- Dimensions
- Size information
- How it works
- How to use it
- What’s included
- Care instructions
- Compatibility
- Warranty information
- Important safety information
Example of a weak product description
Blue cotton shirt for men.
This gives customers very little useful information.
Example of a stronger product description
Designed for everyday wear, this men’s slim-fit cotton shirt features a lightweight fabric, button-front closure, and a comfortable fit. Its versatile blue color makes it suitable for casual occasions, workwear, and weekend outfits.
The second version gives shoppers considerably more context.
Write for customers first
Avoid writing product descriptions that are simply a collection of keywords.
Instead of repeatedly using:
men’s cotton shirt, cotton shirt for men, best men’s cotton shirt…
write naturally and explain why someone should buy the product.
Useful, original product information is generally more valuable than keyword repetition.
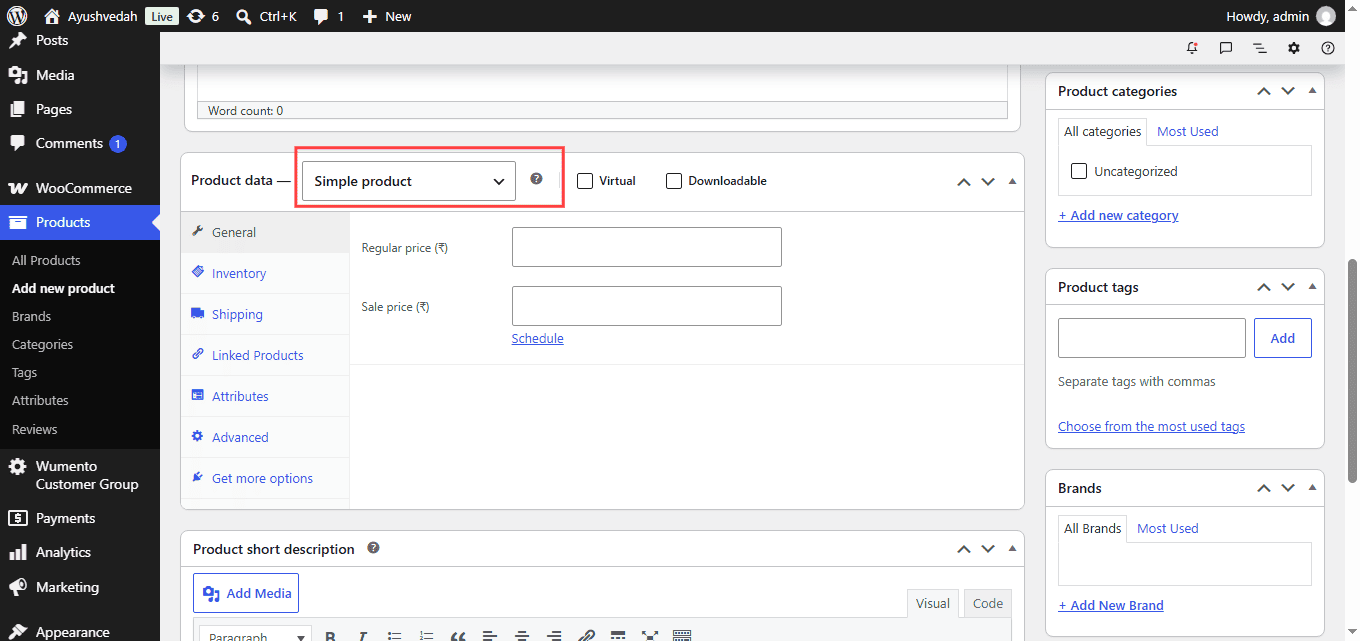
Step 4: Choose the Correct Product Type
WooCommerce supports several core product types.
The most common include:
Simple Product
A simple product is a single product without selectable variations.
Examples include:
- Books
- Mugs
- Basic accessories
- Single digital products
- Individual physical products
Variable Product
A variable product has different options or variations.
For example:
- T-shirt available in Small, Medium, and Large
- Shoes available in multiple sizes
- Product available in different colors
- Furniture available in different finishes
Individual variations can have their own pricing, stock, SKU, images, and other product information.
Grouped Product
A grouped product allows multiple existing products to be presented together.
This can be useful for product collections or related products.
External/Affiliate Product
An external product is useful when the product is promoted on your website but purchased somewhere else.
WooCommerce provides these product types as part of its core product functionality.
Consider screenshot below.
Step 5: Add the Product Price
Pricing is one of the most important product settings.
In the Product data section, enter your:
- Regular price
- Sale price, if applicable
For example:
Regular price: $49.99
Sale price: $39.99
Only use a sale price when it represents a genuine pricing offer.
Consider your complete product cost
Before setting your price, consider:
- Product cost
- Packaging
- Shipping
- Payment processing fees
- Taxes
- Marketplace or platform fees
- Advertising costs
- Returns and refunds
- Desired profit margin
Consider screenshot below.
Your WooCommerce product price should support the overall economics of your business.
Step 6: Add a Product Image
A high-quality product image is essential for an online store.
Customers cannot physically examine your product, so images need to provide as much visual information as possible.
Set the main product image in the Product image section.
Your primary product image should ideally:
- Clearly show the product
- Be well lit
- Have a clean background
- Be sharp and high resolution
- Show the product at an appropriate size
- Match your brand’s visual style
Avoid using blurry, stretched, or extremely small images.
Consider Screenshot.
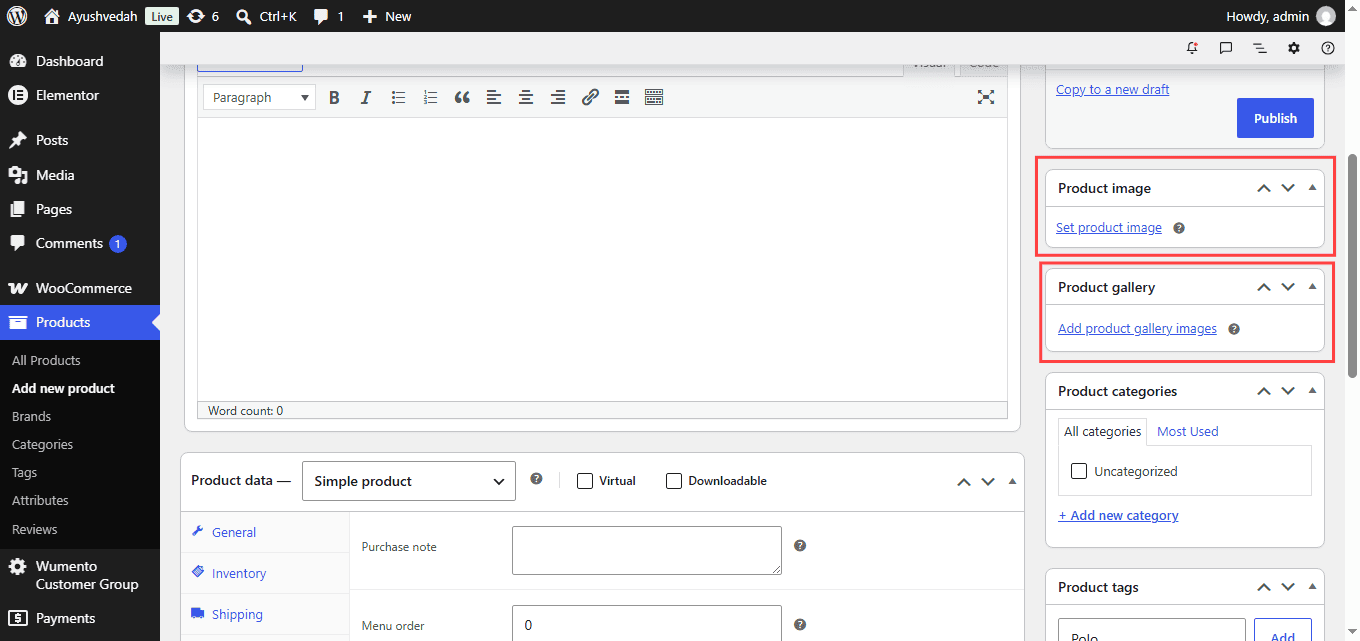
Step 7: Add Product Gallery Images
Don’t rely on a single image when additional images can answer customer questions.
Use the product gallery to show different views or important product details.
For example, you might include:
- Front view
- Back view
- Side view
- Close-up detail
- Product in use
- Packaging
- Size comparison
- Important features
Product images can also help reduce uncertainty before purchase.
Optimize your product images
Before uploading images:
- Resize unnecessarily large images
- Use descriptive file names
- Avoid uploading extremely large files
- Use appropriate image formats
- Add useful alternative text
- Keep image quality high enough for customers to inspect the product
For example, instead of:
IMG_4837.jpg
use something descriptive such as:
blue-cotton-mens-shirt.jpg
The file name should describe the image naturally rather than being stuffed with keywords.
Step 8: Choose a Product Category
Product categories help organize your store.
For example, an apparel store might use:
- Men’s Clothing
- Women’s Clothing
- Shoes
- Accessories
A home store might use:
- Kitchen
- Bedroom
- Living Room
- Home Decor
Choose the most relevant category for each product.
You can create categories from:
Products → Categories
You can also create or assign categories while editing a product.
Keep your category structure simple
Avoid creating dozens of extremely narrow categories if they don’t provide meaningful value to customers.
A simple structure is usually easier to navigate.
For example:
Clothing
- Men’s Clothing
- Women’s Clothing
- Kids’ Clothing
can be easier to manage than creating a separate category for every color, material, and size.
Use product attributes and filters for characteristics such as size, color, and material when appropriate.
Step 9: Add Product Tags When Useful
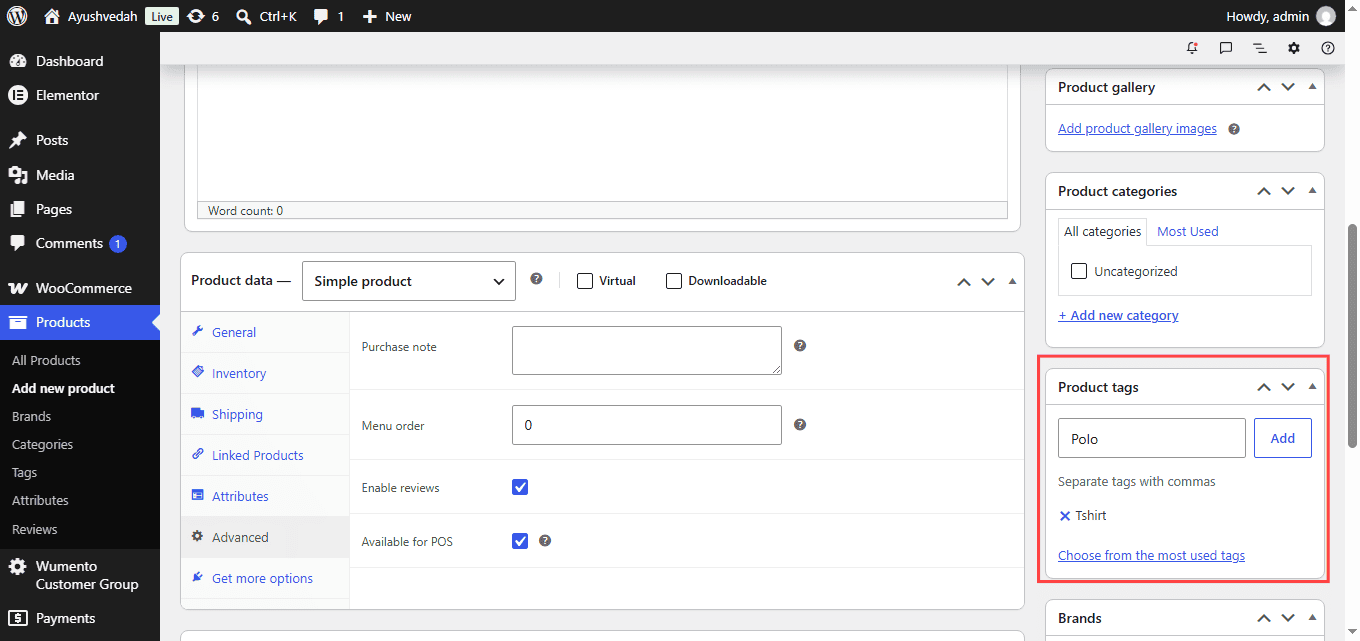
Product tags can provide another way to organize related products.
For example:
- Summer
- Organic
- Bestseller
- Gift
- New Arrival
However, don’t create dozens of tags just for SEO.
Use tags when they genuinely help organize or connect products.
Your primary product organization should remain clear and logical.
Consider screenshot.
Step 10: Configure Inventory
If you sell physical products, inventory management is an important part of WooCommerce.
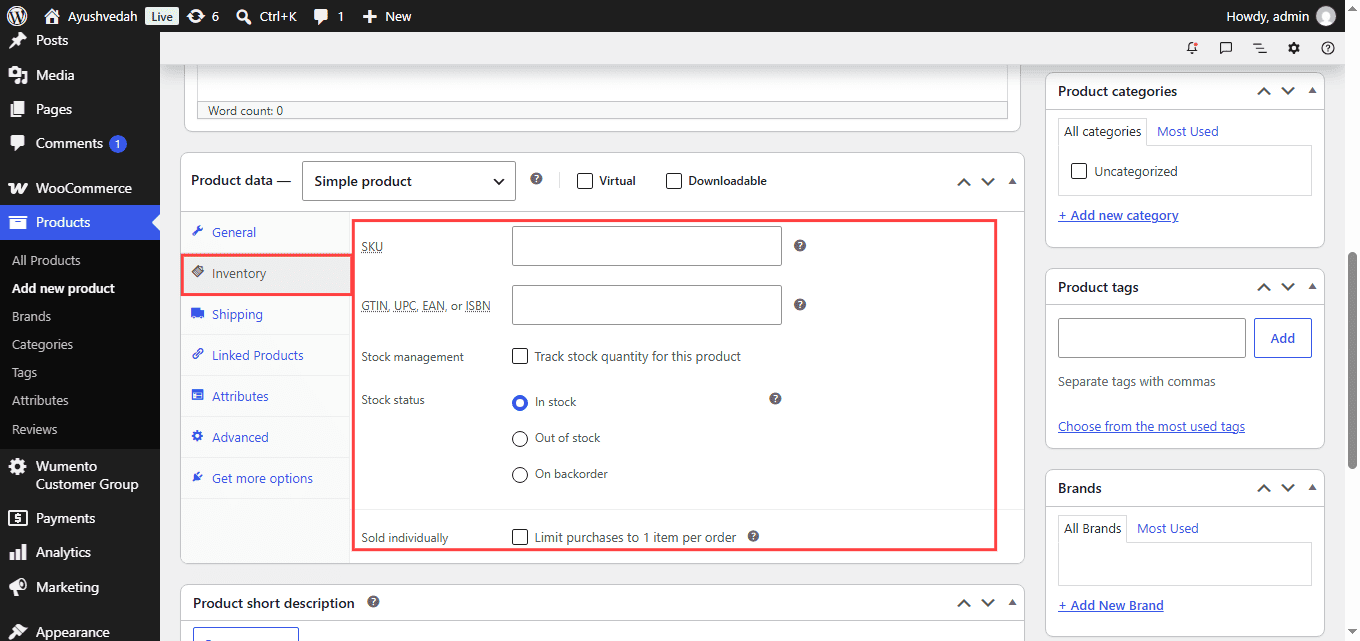
In the Inventory section, you can configure settings such as:
- SKU
- Stock management
- Stock quantity
- Stock status
- Backorders
- Sold individually
What is an SKU?
SKU stands for Stock Keeping Unit.
An SKU is an internal identifier used to distinguish products or variations.
For example:
TSHIRT-BLU-M
could represent:
- T-shirt
- Blue
- Medium
Create a consistent SKU system that makes sense for your business.
Consider screenshot below.
Enable stock management when appropriate
If you want WooCommerce to automatically track inventory quantities, enable stock management and enter the available quantity.
For example:
Stock quantity: 25
When customers purchase products, WooCommerce can update the available stock based on your inventory settings.
Step 11: Configure Shipping Information
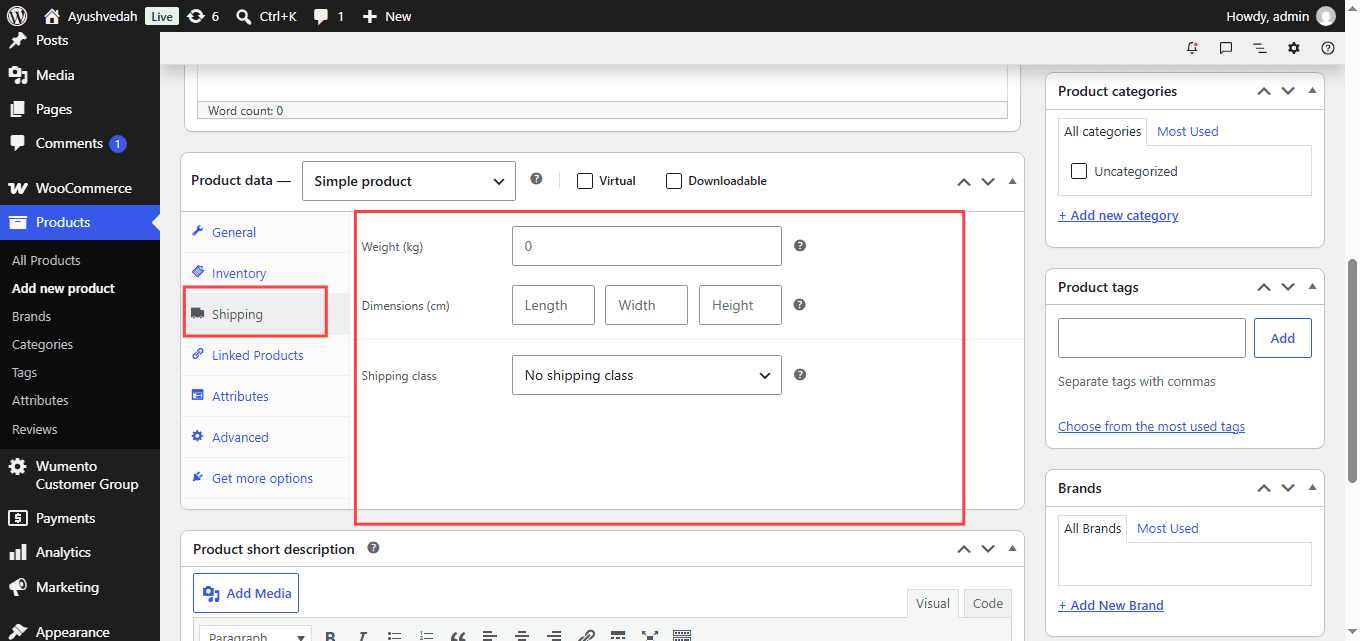
For physical products, the Shipping section can contain information such as:
- Weight
- Length
- Width
- Height
- Shipping class
Accurate product dimensions and weight can be particularly important if your shipping methods calculate rates based on package information.
Consider screenshot below.
Before entering measurements, check the units configured for your store.
For example, your store may use:
- Kilograms for weight
- Centimeters for dimensions
Make sure your measurements are consistent across products.
Step 12: Add Product Attributes
Attributes describe important characteristics of your products.
Common attributes include:
- Color
- Size
- Material
- Brand
- Style
- Finish
Consider screenshot.
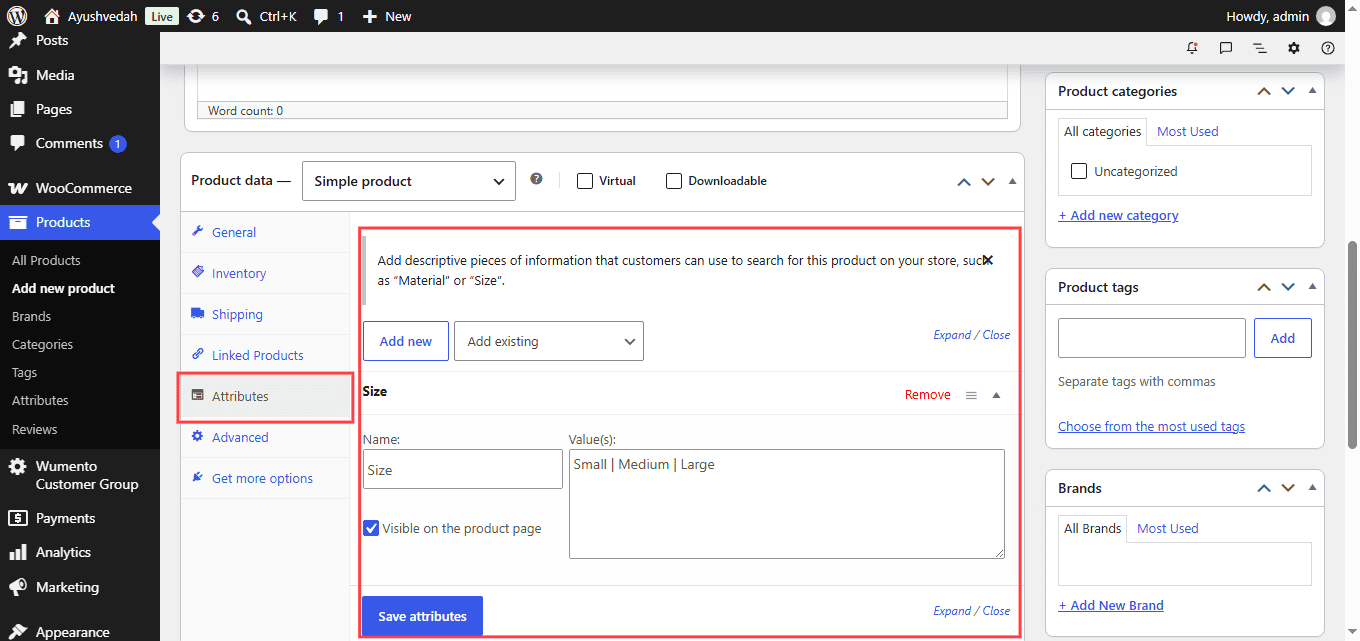
Attributes can also be used to create variations.
For example:
Color: Black, White, Blue
Size: Small, Medium, Large
For products with selectable options, properly structured attributes make it easier to build a variable product.
Step 13: Create Product Variations
If your product comes in multiple options, you may need a Variable product.
For example:
Product: Classic Cotton T-Shirt
Color:
- Black
- White
- Blue
Size:
- Small
- Medium
- Large
Each variation can potentially have its own:
- Price
- SKU
- Stock quantity
- Image
- Shipping information
When should you use variations?
Use variations when customers need to select an option before purchasing.
For example:
Select Size: Medium
or
Select Color: Blue
If every option is actually a separate product with its own product page and purchasing process, separate products may be more appropriate.
Step 14: Add a Short Product Description
WooCommerce also provides a Short description area.
This is different from the main product description.
The short description should quickly communicate the most important selling points.
For example:
Lightweight 100% cotton shirt with a slim fit and breathable fabric. Available in multiple sizes and colors.
A good short description is:
- Concise
- Benefit-focused
- Easy to scan
- Relevant to the product
- Different from the main description
Think of it as a quick summary for shoppers who are scanning the page.
Step 15: Add Upsells and Cross-Sells
WooCommerce allows you to connect related products.
Upsells
An upsell is a product you recommend instead of the product the customer is currently viewing.
For example:
Customer is viewing a basic coffee maker → recommend a premium coffee maker.
Cross-sells
A cross-sell is a complementary product.
For example:
Customer buys a coffee maker → recommend coffee filters.
Used correctly, these recommendations can help customers discover relevant products and increase average order value.
Consider screenshot below.
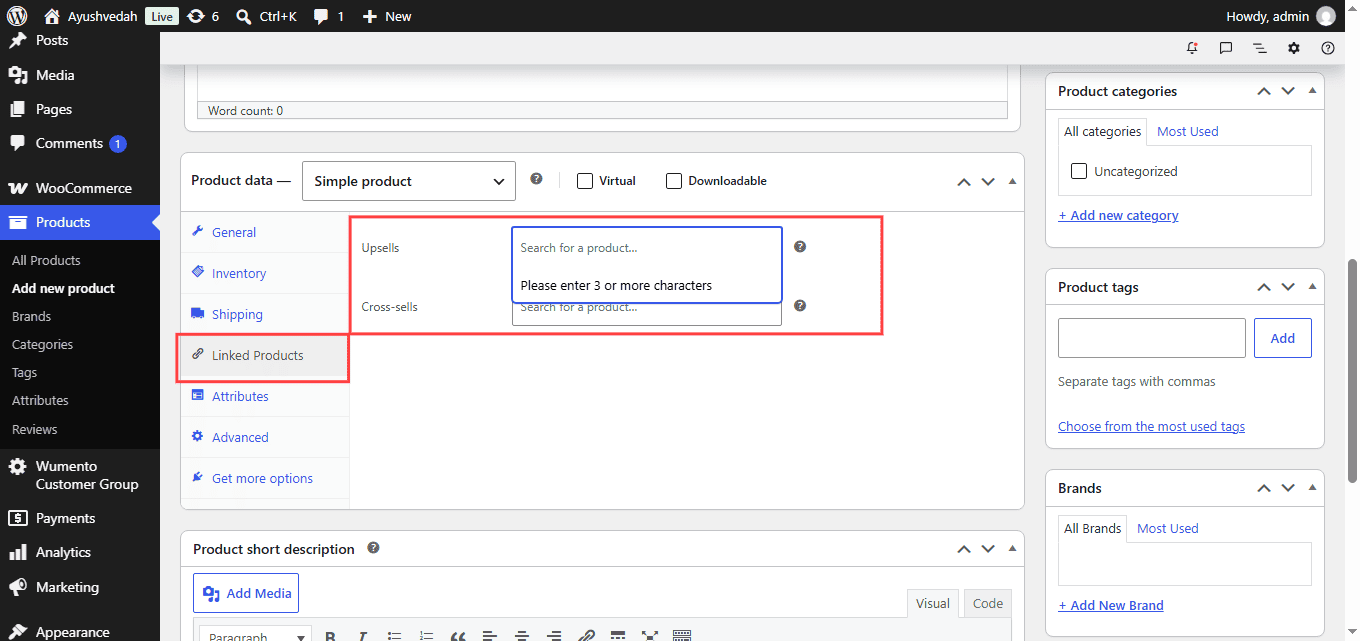
Don’t recommend unrelated products simply to add more links.
Step 16: Optimize Your Product for SEO
Adding a product is only part of the job.
You should also optimize the product page so search engines can understand its purpose.
Optimize the product title
Use a clear product name that naturally describes what you sell.
Optimize the product description
Provide original and useful information rather than copying descriptions from manufacturers or competitors.
Optimize the URL
Keep the product URL short and descriptive.
For example:
/blue-cotton-shirt/
is generally easier to understand than a URL containing unnecessary words or parameters.
Optimize images
Use descriptive image file names and appropriate alternative text.
Use structured information
Your WooCommerce store and SEO setup should provide search engines with appropriate product information such as:
- Product name
- Image
- Description
- Price
- Availability
- Brand
- SKU
Reviews, when applicable
Use valid structured data rather than manually adding inaccurate or misleading information.
Step 17: Make Your Product Description Helpful for AI Search
Search is changing beyond traditional Google results.
Customers increasingly ask AI assistants questions such as:
“What is the best type of product for…?”
“Compare these products.”
“Which product should I buy for…?”
To make your product information easier for search engines and AI systems to understand, write clear and factual product information.
Include important details such as:
- What the product is
- Who it is designed for
- Main features
- Materials
- Dimensions
- Available options
- Important limitations
- How to use it
- Care instructions
- Shipping information
- Warranty information
- Frequently asked questions
Avoid vague marketing language that doesn’t communicate useful facts.
For example:
Instead of:
The ultimate revolutionary product that will transform your life!
write:
This stainless-steel water bottle holds 750 ml and includes a leak-resistant screw-top lid. It is designed for everyday use and fits most standard vehicle cup holders.
The second description provides information that both customers and information-retrieval systems can understand.
Step 18: Review Product Visibility Before Publishing
Before clicking Publish, check your product’s visibility settings.
Make sure the product is intended to appear in the appropriate parts of your store.
Depending on your WooCommerce configuration, products can have different catalog visibility options.
For a product you want customers to find through your store and search, make sure it isn’t accidentally hidden from the catalog or search results.
Step 19: Preview the Product Page
Before publishing or announcing your product, preview it as a customer would see it.
Check the page on:
- Desktop
- Tablet
- Mobile
Look for:
- Product title
- Images
- Price
- Description
- Add to Cart button
- Variations
- Stock status
- Shipping information
- Product options
- Related products
- Reviews
- Page layout
Pay particular attention to mobile.
A product page that looks excellent on desktop can still have usability problems on a small screen.
Step 20: Publish Your First WooCommerce Product
Once you’ve checked everything, click Publish.
Your first WooCommerce product is now created.
However, don’t immediately assume the setup is complete.
Place yourself in the customer’s position and ask:
- Can I understand this product quickly?
- Are the images clear?
- Is the price obvious?
- Can I select the correct variation?
- Do I know what is included?
- Do I know how the product will be shipped?
- Can I easily add it to my cart?
- Is the page easy to use on mobile?
These questions can reveal problems before your customers encounter them.
Common Mistakes When Adding WooCommerce Products
1. Using very short product descriptions
A description such as “Premium product. Buy now!” doesn’t give customers enough information.
Explain the product, its features, benefits, specifications, and intended use.
2. Using poor-quality images
Low-quality images can reduce customer confidence.
Use clear, properly sized images that show the product accurately.
3. Ignoring inventory
If your store sells physical products, incorrect stock information can lead to overselling or disappointed customers.
4. Creating too many categories
An overly complicated category structure can make your store harder to navigate.
Create categories based on meaningful product groups.
5. Keyword stuffing
Repeating the same keyword throughout your product page doesn’t make the content better.
Write naturally for customers.
6. Copying manufacturer descriptions
Duplicate product descriptions can make it harder for your pages to stand out.
Where possible, create original descriptions that explain your product from your customer’s perspective.
7. Forgetting mobile users
Many customers browse and purchase from mobile devices.
Always check how your product page looks and functions on a smartphone.
8. Publishing without testing
A product page isn’t finished simply because it has been published.
Test the product selection, cart, checkout, pricing, inventory, and customer experience.
How Many Products Should You Add Before Launching?
You don’t necessarily need dozens or hundreds of products before launching your WooCommerce store.
If you’re starting a new store, focus on creating a small number of complete, high-quality product listings first.
For example, you could begin with:
- 3–5 carefully optimized products
- Clear product categories
- High-quality product photography
- Complete descriptions
- Correct pricing
- Accurate inventory
- Tested checkout
Once the store is working correctly, you can continue adding products.
Quality and consistency are more important than publishing a large number of incomplete product pages.
Frequently Asked Questions About Adding Products in WooCommerce
How do I add my first product to WooCommerce?
Go to WordPress Dashboard → Products → Add New. Enter your product name, description, price, image, category, inventory information, and other relevant product details. Review the settings and click Publish.
What information do I need to add a WooCommerce product?
At a minimum, a basic product can be created with a product name and price. For a complete product page, you should also consider adding a detailed description, images, category, inventory information, shipping details, attributes, and a short description.
What is the difference between a simple and variable product in WooCommerce?
A simple product is generally a single product without selectable variations. A variable product allows customers to choose options such as size or color, with individual variations potentially having their own price, SKU, stock, and image.
How do I add product images in WooCommerce?
While editing a product, use the Product image section to add the primary image. You can add additional images through the Product gallery section.
How do I add categories to WooCommerce products?
You can create and manage product categories under Products → Categories. When editing a product, select the relevant category from the Product Categories section.
Should every WooCommerce product have an SKU?
An SKU is not required for every store, but using consistent SKUs can make inventory management easier, especially when a store has many products or variations.
Can I change a WooCommerce product after publishing it?
Yes. You can edit a published product whenever you need to update information such as the description, price, images, inventory, shipping details, categories, or other product settings.
How many products should I add to WooCommerce?
There is no fixed number of products required. For a new store, it is generally better to launch with a manageable number of complete, well-tested product pages than to publish a large number of incomplete listings.
How can I optimize WooCommerce products for SEO?
Use descriptive product names, original and useful descriptions, clean URLs, high-quality optimized images, relevant categories, appropriate structured data, and accurate product information. Avoid keyword stuffing and duplicate descriptions.
Do WooCommerce products need descriptions?
Although WooCommerce can create a basic product with minimal information, detailed product descriptions are strongly recommended because they help customers understand the product and provide additional useful information about the page.
Final Thoughts
Adding your first products in WooCommerce is more than entering a product name and price.
A successful product page combines accurate product information, compelling copy, high-quality images, correct inventory, clear organization, useful product options, shipping information, and search-friendly content.
Start with a small number of products and make each product page as complete and useful as possible. Once your product setup is working correctly, you can scale your catalog while maintaining the same standards.
Your first product doesn’t need to be perfect forever. WooCommerce allows you to edit product information later, so treat your initial product setup as the foundation for a store that you can continuously improve.
Ready for the next step? Continue with our complete guide to How to Set Up Your First WooCommerce Store.