
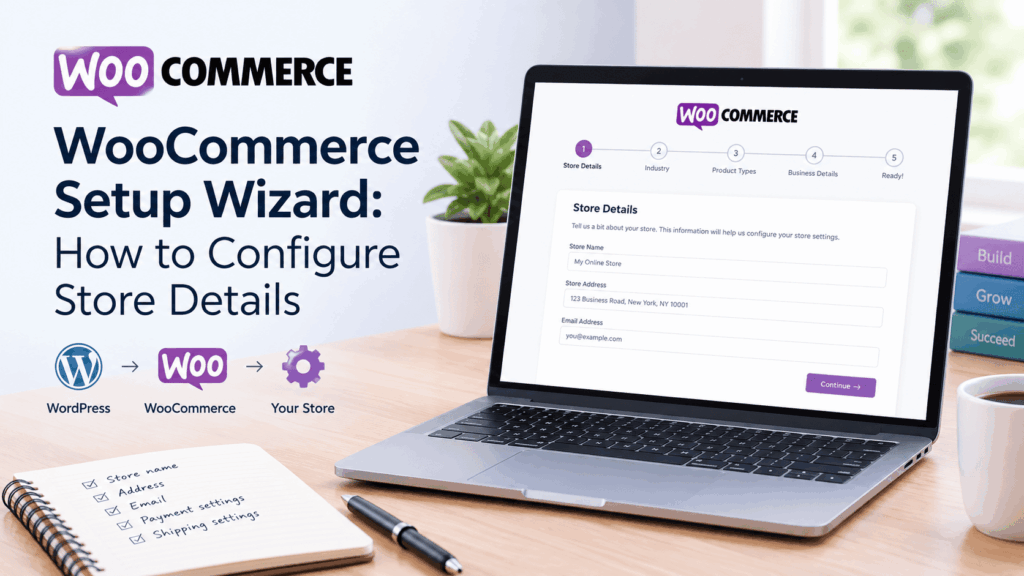
After installing WooCommerce on WordPress, one of the first steps is configuring your store details. WooCommerce uses this information to determine important settings such as your store location, selling regions, shipping regions, and currency.
The Configure Store Details step is part of the WooCommerce Setup Wizard and helps establish the basic information WooCommerce needs before you start adding products and accepting orders.
WooCommerce Setup Wiard in Details
In this guide, you’ll learn how to configure WooCommerce store details correctly, what each setting means, and which options you should choose for your online store.
What Are WooCommerce Store Details?
WooCommerce store details are the basic business and location settings that tell WooCommerce where your store operates and where you intend to sell and ship products.
Depending on your WooCommerce version and configuration, the Setup Wizard may ask you to provide information such as:
- Store address
- Country or region
- City
- State or province
- Postal code
- Selling locations
- Shipping locations
- Currency
- Product type or business information
These settings can affect how WooCommerce calculates prices, displays currency, determines available shipping destinations, and applies certain tax and payment settings.
Tip: Enter your real business or operating location whenever possible. You can change many WooCommerce settings later from the WordPress dashboard.
Where to Find the WooCommerce Store Details Setup
If you have just installed WooCommerce, the WooCommerce Setup Wizard normally guides you through the initial configuration process.
The exact appearance of the wizard can vary depending on your WooCommerce version, WordPress configuration, and installed extensions.
If you are already past the Setup Wizard, you can manage your store’s main location and related settings from:
WordPress Dashboard → WooCommerce → Settings
The General settings area contains important store location, selling, shipping, and currency options.
How to Configure Store Details in WooCommerce
Let’s go through the Store Details setup step by step.
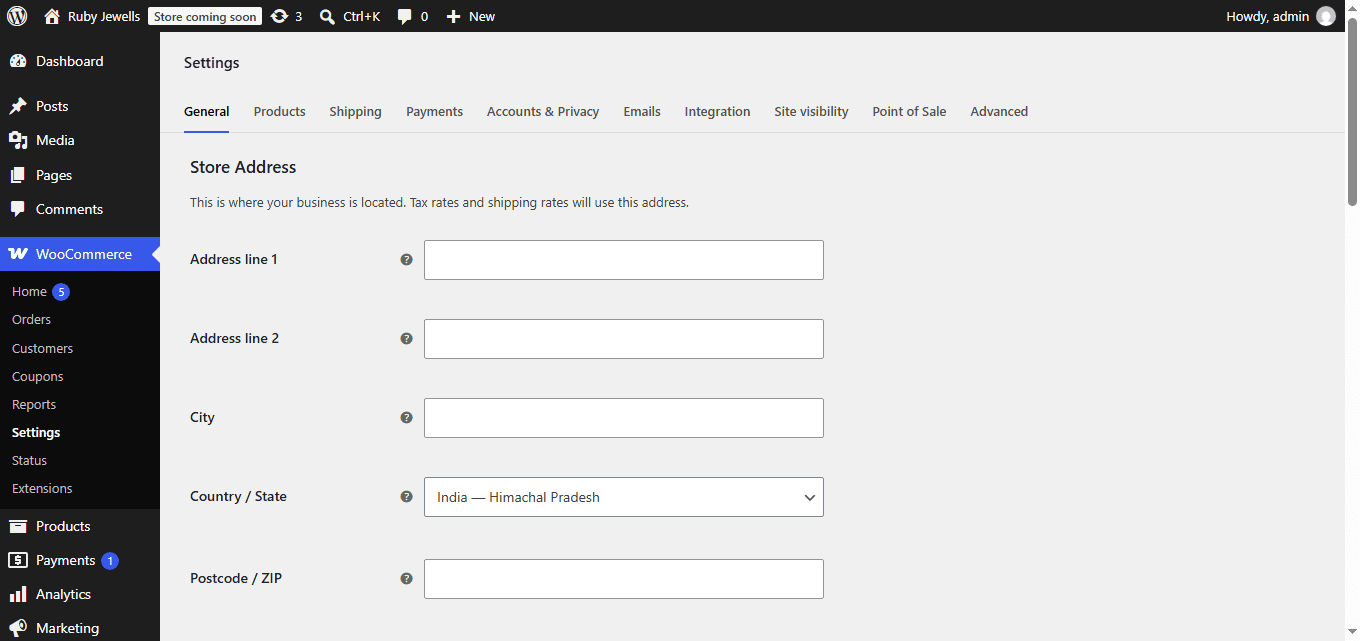
Step 1: Enter Your Store Address
The first important piece of information is your store address.
WooCommerce may ask for:
- Address
- Address line 2
- City
- State or province
- Postal or ZIP code
- Country or region
Enter the location associated with your business or the location from which your store operates.
For example:
Address: 123 Main Street
City: Chandigarh
State: Punjab
Postal Code: 160001
Country: India
Your actual information will, of course, depend on your business.
Why Is the WooCommerce Store Address Important?
Your store location can be used by WooCommerce and its extensions when determining settings related to:
- Taxes
- Shipping
- Currency
- Customer location
- Store operations
- Order information
For physical products, your business or fulfillment location can also be important when configuring shipping zones and shipping methods.
Important: Your store address does not necessarily mean that customers will see your private residential address. If you operate from a home address, check the settings of your theme, checkout, invoices, emails, and payment/shipping extensions to make sure you are comfortable with what information is publicly displayed.
Step 2: Select Your Country or Region
Choose the country or region where your store is based.
This is an important WooCommerce setting because other configuration options can depend on your store location.
For example, a store based in India may need different tax, payment, shipping, and currency configurations from a store based in the United States or the United Kingdom.
Select the country that accurately represents your business location.
Can You Change the Country Later?
Yes. WooCommerce allows you to modify your store location after the initial setup.
However, changing your store location after configuring taxes, shipping, payments, and other settings can require you to review those settings again.
For that reason, it’s better to enter the correct information during the initial setup whenever possible.
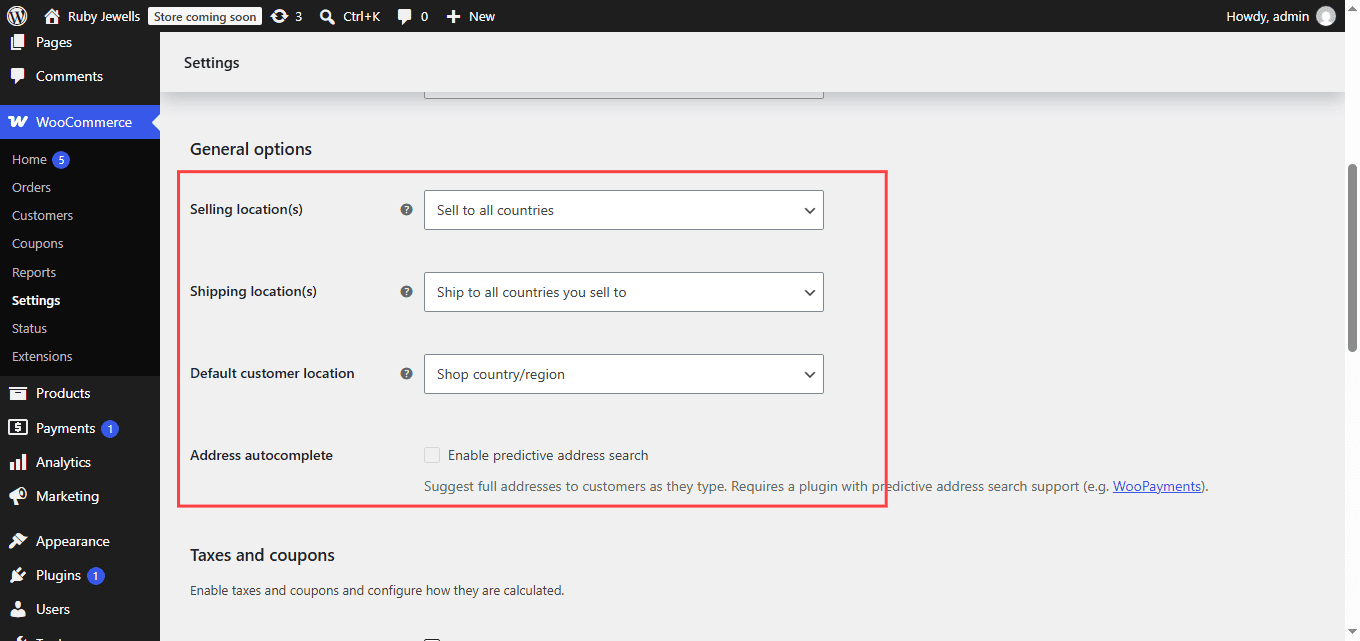
Step 3: Choose Where You Want to Sell
WooCommerce can be configured to control where you sell your products.
Depending on your business, you may want to:
- Sell worldwide
- Sell to specific countries
- Sell only to your home country
- Restrict sales to selected regions
For example, if your business operates in India and only sells within India, you can configure WooCommerce so that your store focuses on the Indian market.
If you sell internationally, you can configure WooCommerce for multiple selling locations. Consider screenshot below.
Why Should You Restrict Selling Locations?
If you don’t sell to every country, restricting your selling locations can simplify your store.
It can prevent customers from placing orders from locations that you cannot serve and can make your shipping and payment configuration easier to manage.
For an international store, however, you should carefully consider:
- Shipping availability
- Import requirements
- Duties and taxes
- Payment methods
- Currency
- Returns
- Local regulations
Your WooCommerce settings should match the countries and regions your business can actually serve.
Step 4: Configure Shipping Locations
If your store sells physical products, WooCommerce also needs to know where you are willing to ship.
Selling locations and shipping locations are related, but they are not necessarily the same thing.
For example, you might allow customers from several countries to purchase your products but only ship to a smaller group of countries.
Your shipping configuration should therefore reflect your actual delivery coverage.
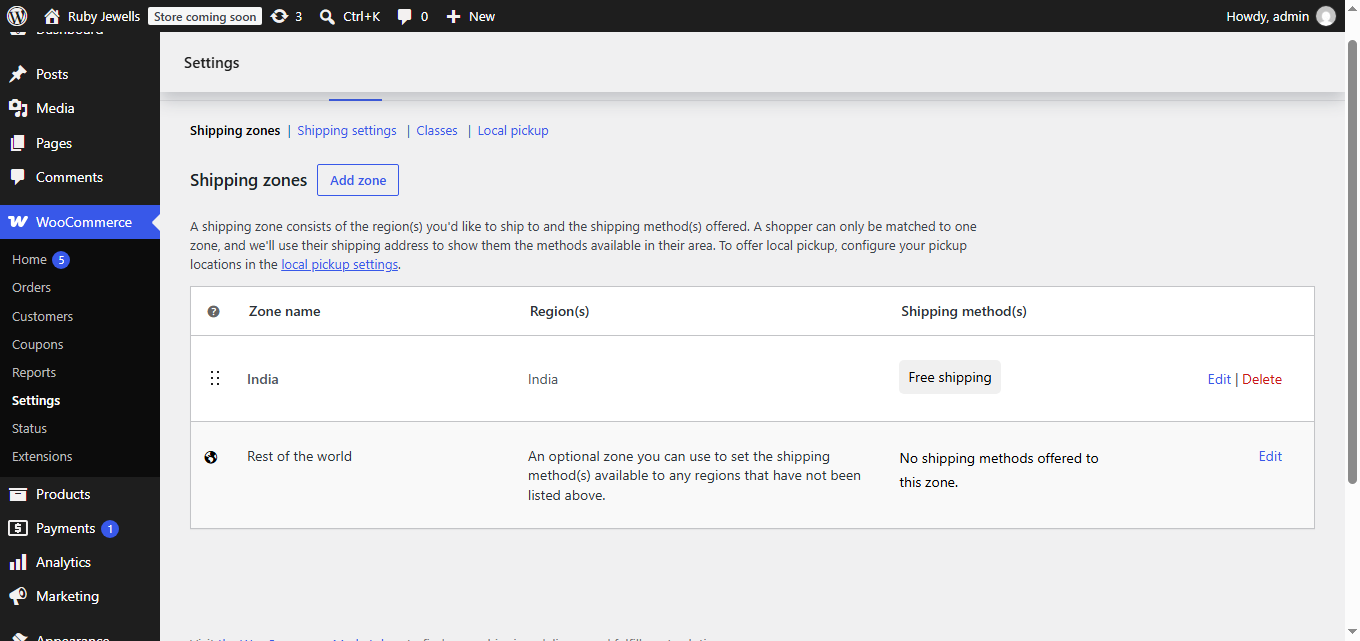
Later, you can configure detailed shipping rules under:
WooCommerce → Settings → Shipping
There you can create shipping zones and assign shipping methods and rates to different locations.
Example
Suppose your store ships throughout India.
You could create a shipping zone covering India and configure shipping methods such as:
- Flat rate
- Free shipping
- Local pickup
The exact methods available will depend on your WooCommerce installation and extensions.
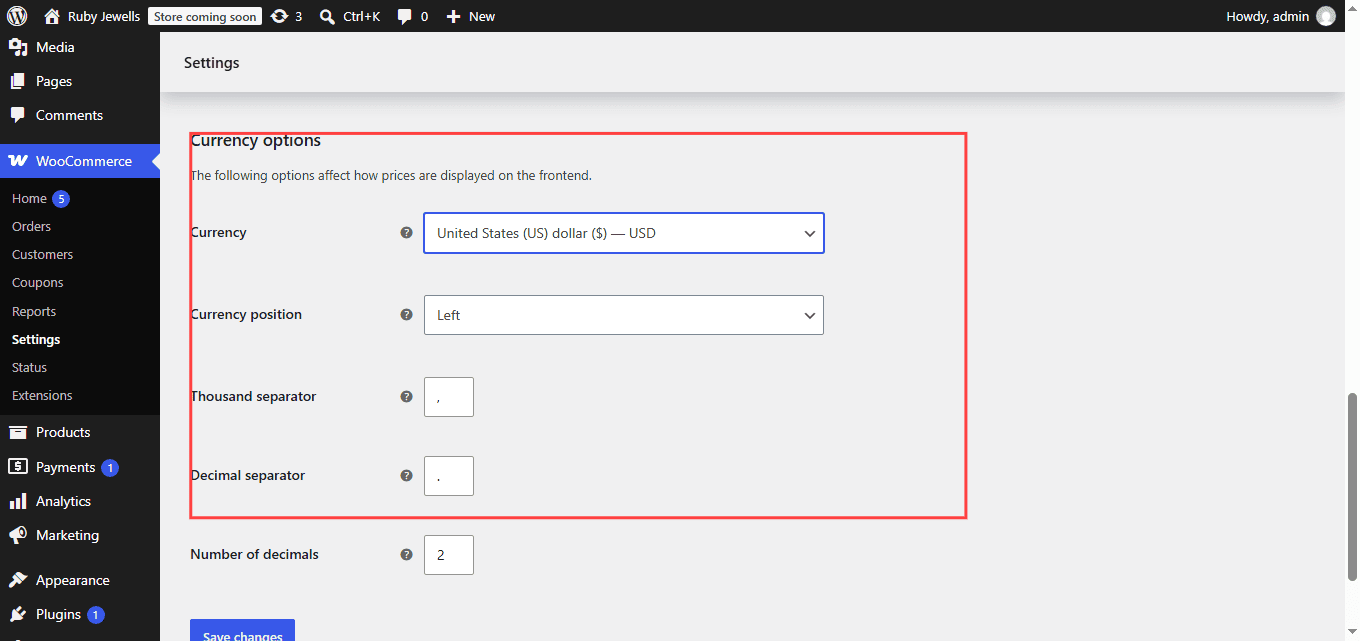
Step 5: Select Your Store Currency
Another important part of configuring WooCommerce store details is choosing your currency.
For example:
- India → Indian Rupee (₹)
- United States → US Dollar ($)
- United Kingdom → Pound Sterling (£)
- European markets → Euro (€)
Choose the currency in which you normally sell your products.
WooCommerce uses this currency when displaying product prices and other store amounts. View screenshot below.
What Should You Consider When Choosing a Currency?
Think about:
- Where your business is located
- Where most of your customers are located
- Which currency your payment gateway supports
- Your accounting requirements
- Whether you plan to sell internationally
If you operate primarily in India and accept payments in Indian Rupees, for example, INR is generally the logical store currency.
Step 6: Configure Currency Position and Number Formatting
WooCommerce also provides settings that control how prices are displayed.
Depending on your configuration, these can include:
- Currency position
- Thousand separator
- Decimal separator
- Number of decimal places
For example, a price could be displayed as:
₹1,499.00
or according to another formatting configuration appropriate for your market.
Choose formatting that is familiar to your customers.
Should You Use Two Decimal Places?
For many currencies, two decimal places are common.
However, the appropriate number of decimal places depends on the currency and the way you price your products.
If your products are normally sold as whole-unit prices, you may prefer to display prices without unnecessary decimal places.
Step 7: Review Your Store Details Before Continuing
Before completing the WooCommerce Setup Wizard, carefully review the information you entered.
Check:
- Store address
- Country or region
- City
- State or province
- Postal code
- Selling locations
- Shipping locations
- Currency
- Currency formatting
A small mistake at this stage can cause confusion later when configuring taxes, shipping, payments, and other store settings.
What Should You Enter in WooCommerce Store Details?
If you’re unsure what to enter, use this simple approach:
| WooCommerce Setting | What to Enter |
|---|---|
| Store address | Your actual business/operating address |
| Country/Region | Country where your store/business operates |
| City | Your business city |
| State/Province | Your applicable state or province |
| Postal Code | Your business postal/ZIP code |
| Selling locations | Countries where you actually sell |
| Shipping locations | Countries/regions where you actually deliver |
| Currency | Currency in which you normally sell |
| Currency formatting | Formatting familiar to your customers |
The correct values depend on your business model, location, customers, and fulfillment arrangements.
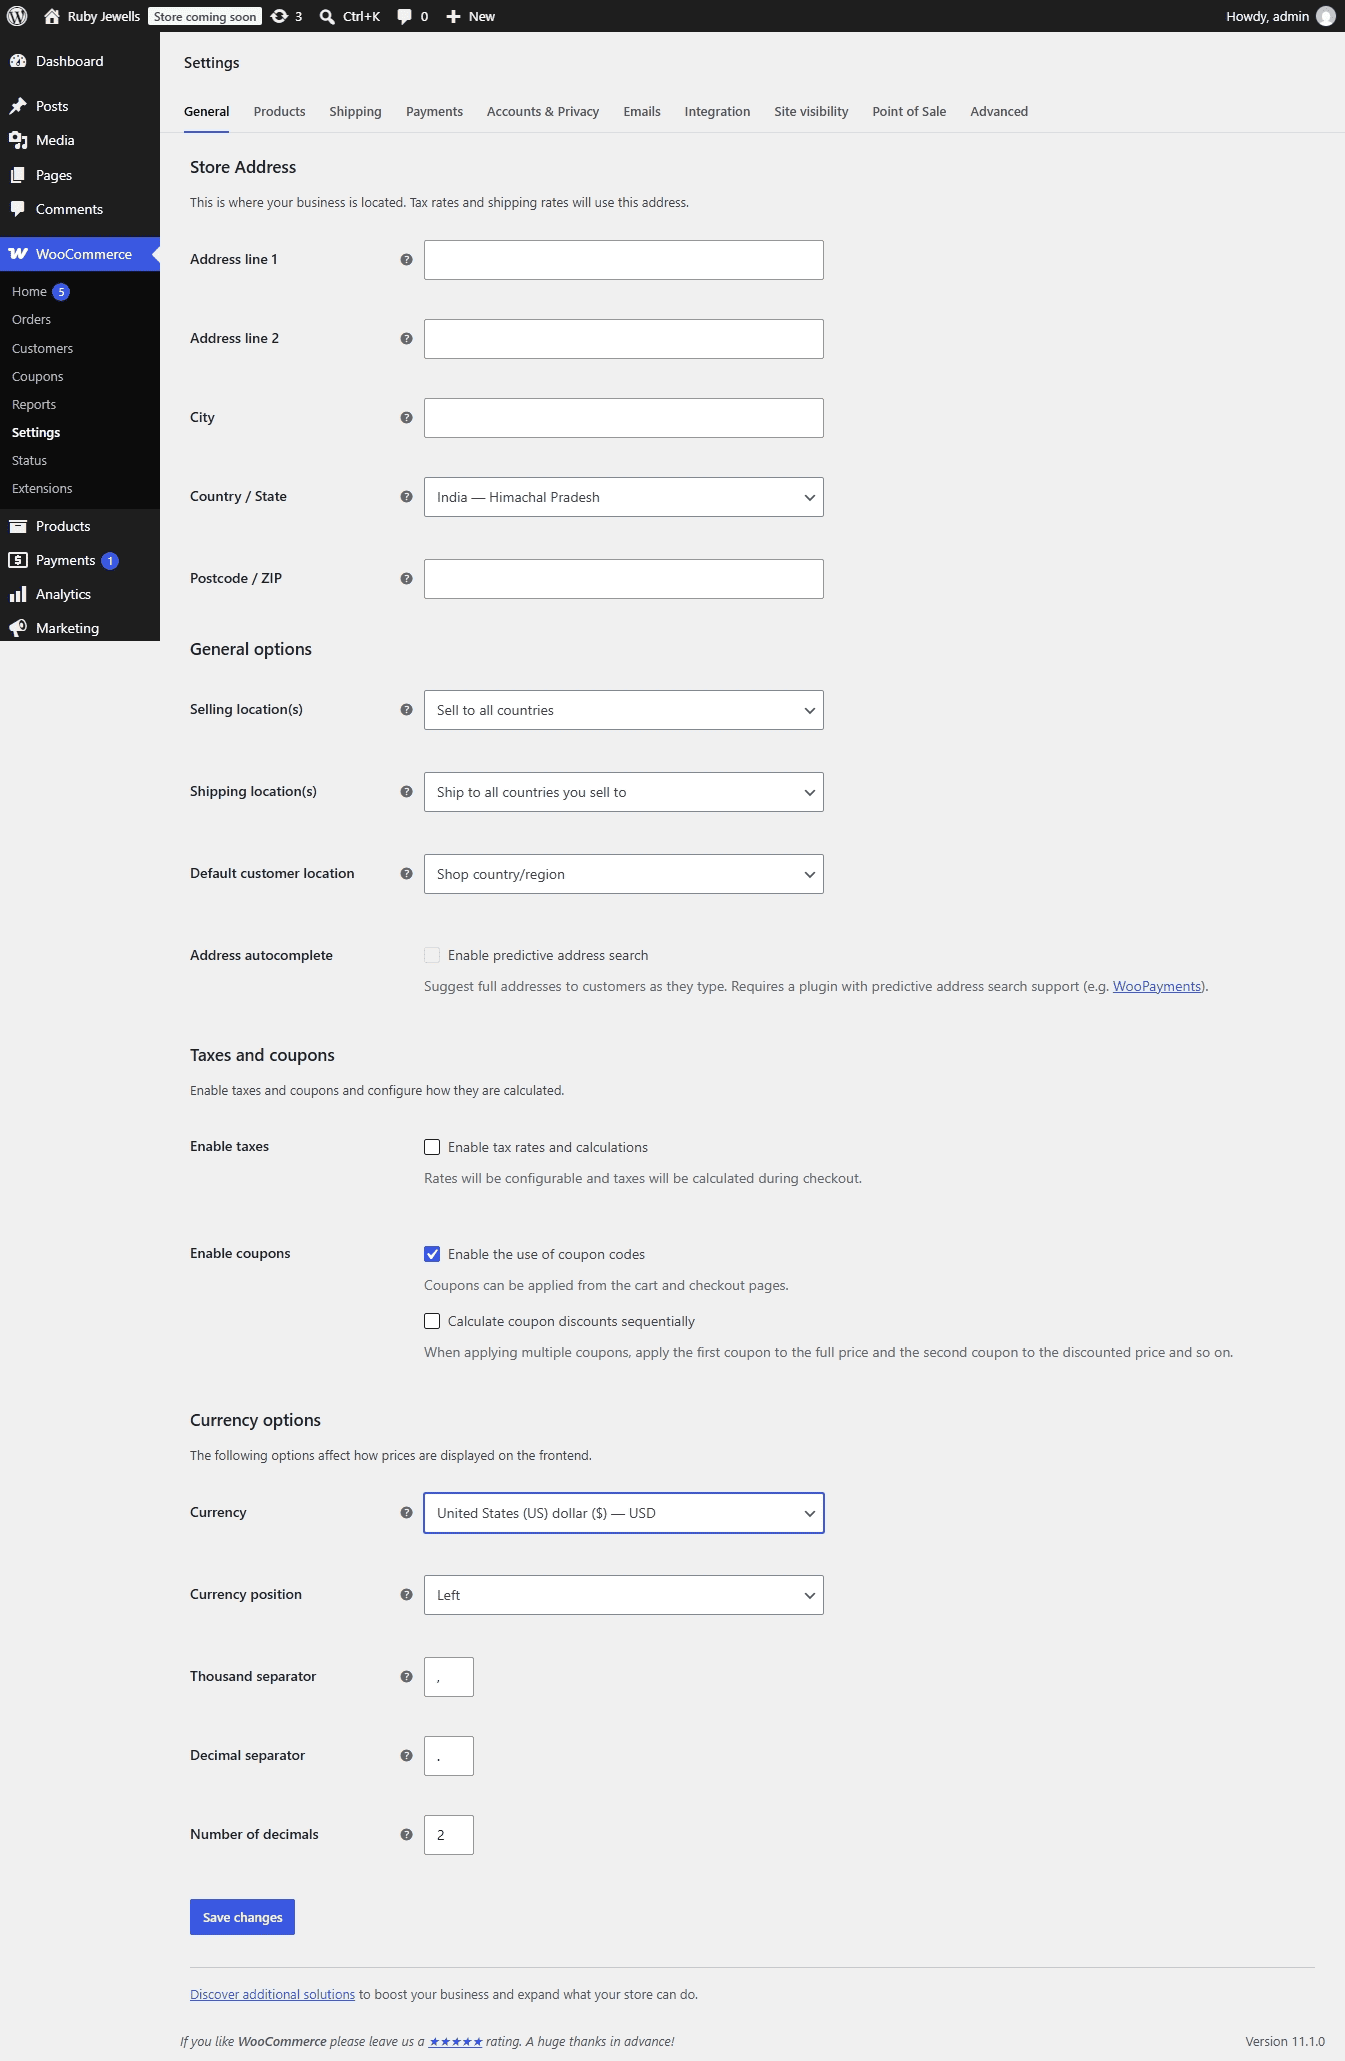
Can You Change WooCommerce Store Details After Setup?
Yes. You are not permanently locked into the information entered during the Setup Wizard.
If you need to change your store location, selling locations, or currency later, you can generally manage these settings from:
WordPress Dashboard → WooCommerce → Settings → General
However, changes to fundamental store settings should be made carefully.
For example, changing your currency after products and orders have already been created can have significant implications for your store’s pricing and reporting. Likewise, changing your location can require you to review tax and shipping settings.
Before making major changes to a live store, review the effects on your existing configuration. View screenshot below.
Common Mistakes When Configuring WooCommerce Store Details
Using an Incorrect Store Location
Don’t enter a random location simply because you expect to sell there.
Your store location should accurately represent your business or operating location.
Choosing the Wrong Currency
Changing currency later can create unnecessary complications.
Choose the currency that makes sense for your primary selling operation and payment setup.
Allowing Sales to Countries You Don’t Serve
If you cannot ship to a country, don’t configure your store as though you can.
Keep your selling and shipping locations aligned with your actual business capabilities.
Assuming Default Settings Are Always Correct
WooCommerce provides sensible defaults, but every business is different.
Review your settings rather than simply clicking through the Setup Wizard.
Ignoring Taxes and Shipping
Store details affect other parts of WooCommerce configuration. After completing the initial setup, make tax and shipping configuration a priority.
Frequently Asked Questions About WooCommerce Store Details
What are WooCommerce Store Details?
WooCommerce Store Details are the basic business and location settings used to configure where your online store operates, where you sell, where you ship, and which currency you use.
Where can I change WooCommerce Store Details?
You can manage the main store settings from WordPress Dashboard → WooCommerce → Settings → General. Some settings may also be available in other WooCommerce settings sections depending on your version and installed extensions.
Does WooCommerce Store Address affect shipping?
Your store location can be relevant to shipping configuration, but your actual shipping rates and delivery destinations are normally configured separately using WooCommerce shipping zones and shipping methods.
Can I sell internationally with WooCommerce?
Yes. WooCommerce can be configured for international selling, provided your business can legally sell and deliver to the countries you target. You may also need to configure international shipping, taxes, currencies, payment methods, and other requirements.
Can I change my WooCommerce currency later?
Yes, WooCommerce allows you to change currency settings. However, changing currency on an established store should be done carefully because it can affect how prices are displayed and how your store operates.
Do I need to configure shipping during the Setup Wizard?
Not necessarily. The initial Store Details step establishes basic store information. You can configure detailed shipping zones and shipping methods later under WooCommerce → Settings → Shipping.
Do WooCommerce Store Details affect SEO?
Store Details themselves are primarily configuration settings rather than an SEO ranking factor. However, accurate business, product, shipping, and geographic information can contribute to a clearer and more trustworthy ecommerce experience.
Can I skip the WooCommerce Setup Wizard?
You can configure WooCommerce settings manually, but using the Setup Wizard can make the initial configuration easier, especially if you’re new to WooCommerce.
Final Checklist: WooCommerce Store Details
Before moving on from the Setup Wizard, make sure you have:
- Entered the correct store address
- Selected the correct country or region
- Entered the correct city and postal code
- Selected appropriate selling locations
- Selected appropriate shipping locations
- Chosen the correct store currency
- Reviewed currency formatting
- Checked your settings before continuing
After that, move on to taxes, shipping, payments, products, emails, and checkout configuration before launching your store.
Final Thoughts
The Configure Store Details step in the WooCommerce Setup Wizard is simple, but it establishes several important foundations for your online store.
Take a few minutes to enter accurate information rather than accepting every default setting. Your store location, selling regions, shipping destinations, and currency should reflect how your business actually operates.
Once your Store Details are configured correctly, you can continue with the rest of your WooCommerce setup, including taxes, shipping, payment gateways, products, checkout, and customer emails.
A properly configured WooCommerce store gives you a much better foundation for managing orders, accepting payments, delivering products, and providing a clear buying experience for your customers.